
|
Overview | |
Internal Visual Inspection |
|
Initial User Contact | |
Running the Dell Diagnostics |
|
External Visual Inspection | |
Getting Help |
|
Observing the Boot Routine |
This section describes basic troubleshooting procedures that can help you diagnose a system problem. These procedures can often reveal the source of a problem or indicate the correct starting point for servicing the system. Dell recommends that you perform the following procedures in the order presented.
 |
NOTE: When you see the question "Is the problem resolved?" in a troubleshooting procedure, perform the operation that caused the problem. |
When you first contact a user who has a problem, ask the user to describe the problem and the conditions under which it occurs. After the user describes the problem, perform the following steps:
Observe the user to determine if he or she is making
an error, such as typing an incorrect key combination or entering a command incorrectly.
Is the problem a result of user error?
Yes. Instruct the user in the proper procedure or direct the user to the
appropriate user documentation for the correct procedure.
No. Proceed to "External
Visual Inspection."
Improperly set switches and controls and loose or improperly connected cables are the most likely source of problems for the system, monitor, or other peripherals (such as a printer, keyboard, mouse, or other external equipment). A quick check of all the switches, controls, and cable connections can easily solve these problems.
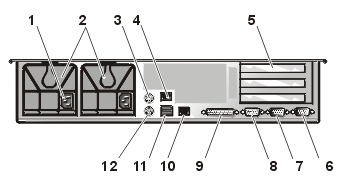
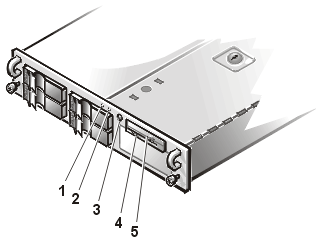
Figure 1 shows the back-panel connections on the system. Figure 2 shows the front-panel controls and indicators on the system.
Figure 1. Back-Panel Features
 |
|
Figure 2. Front-Panel Features
 |
|
The external visual inspection consists of a quick inspection of the exterior of the
system, the monitor, the keyboard, any peripherals, and cables. While performing the visual inspection, make any necessary corrections. To perform the external visual inspection, perform the following steps:After you have performed an external visual inspection as described in the previous section, you should boot the system and, while the boot routine is running, observe the system for any indications of problems.
|
NOTE: Most of the steps in this procedure require observation of system functions and indications, some of which can occur simultaneously. It may be necessary to reboot the system several times to complete all of these steps. |
To perform the following procedure, you need a Dell Diagnostics diskette created from the Dell OpenManage Server Assistant CD. If such a diskette is not available, you can create it as described in the systems User’s Guide. If a separate diagnostics diskette is included with the system, you may need to use that diskette.
To observe problem indications during the boot routine, perform the
following steps:
Does the fan run normally?
Yes. Proceed to step 3.
No. Troubleshoot the system power supply.
Do these indicators flash on and off within approximately 10 seconds after the boot
routine starts?
Yes. Proceed to step 4.
No. Troubleshoot the system power supply. If the troubleshooting
procedure indicates that the system power supply is operational, troubleshoot the memory.
Does the Diagnostics menu appear?
Yes. See "Running
the Dell Diagnostics."
No. Proceed to step 6.
Does the Diagnostics menu appear?
Yes. See "Running the Dell Diagnostics."
No. Proceed to "Internal Visual Inspection."
| NOTICE: Before you proceed with the internal visual inspection described in this section, ensure that the user has saved all open files and exited all open application programs, if possible. |
A simple visual inspection of a system’s interior hardware can often lead to the source of a problem, such as a loose expansion card, cable connector, or mounting screw. When you perform the visual inspection, see "System Features" to locate components referenced in the inspection procedure.
To perform the internal visual inspection, perform the following steps:
 |
CAUTION: Before beginning to work inside the system, disconnect the power supply from the power source and the power supply cables from the power supply. |
|
CAUTION: The heat sink can get extremely hot during system operations. Be sure that it has had sufficient time to cool before touching it. |
|
CAUTION: When handling the heat-sink assembly, take care to avoid sharp edges on the heat sink. |
- To ensure that the chips are fully seated in their sockets, press firmly on the top of each chip.
- To remove and reseat a microprocessor and heat-sink assembly, perform the steps described in "Upgrading the Microprocessor or Installing a Secondary Microprocessor."
- To remove and reseat a memory module, perform the steps described in "Memory Modules."
The Dell Diagnostics contains tests that aid in troubleshooting all major components of the system. To run the tests, you must first create the Dell Diagnostics diskette using the Dell OpenManage Server Assistant CD as described in "Using the Dell OpenManage Server Assistant CD" in the User’s Guide. If a separate Dell Diagnostics
diskette is included with the system, you may need to use that diskette.To start the Dell Diagnostics, turn off the system, insert the Dell Diagnostics diskette into the diskette drive, and then turn on the system.
Starting the diagnostics causes the Dell logo screen to appear on the monitor, followed by a message indicating that the diagnostics is loading. Before the diagnostics loads, a program tests the portion of main memory (RAM) required for loading the diagnostics. If a RAM error is detected, a message telling you which
memory module has failed appears on the screen.If no errors are found in RAM, the diagnostics loads and the Diagnostics menu appears. The menu allows you to run all or specific diagnostic tests or to exit the Dell Diagnostics. The diagnostics main screen includes the following options:
Use the Devices option to select individual devices within the device group(s). When you select Devices, the following options are displayed: Run Tests, Tests, Select, Parameters, and Help. Table 1 lists all of the possible values for each option.
Table 1. Devices Options
| Option | Possible Values |
| Run Tests | Displays five options: One, Select, Options, Results, Errors, and Help. |
| Tests | Allows you to select individual devices to tailor the testing process to your particular needs. You can choose one or more devices from the list. When you choose Tests, four options are displayed: Run Tests, Select, Parameters, and Help. |
| Select | Allows you to choose one or more devices from a particular device group. Three options are displayed: One, All, and Help. |
| Parameters | Determines how a particular test will be run. |
| Help | Displays a list of help topics. |
See "Running Dell Diagnostics" in the Installation and Troubleshooting Guide for more specific information about the Dell Diagnostics.
If none of the troubleshooting procedures in this section or the tests in the Dell Diagnostics reveals the source of the problem or leads to the proper troubleshooting steps for determining the source of the problem, refer to the Support pages at http://support.dell.com or call Dell for technical assistance. For instructions on contacting Dell, see "Getting Help" in the Installation and Troubleshooting Guide.