
|
Overview | |
Using the System Password Feature |
|
Responding to Error Messages | |
Using the Setup Password Feature |
|
Using the System Setup Program | |
Disabling a Forgotten Password |
|
System Setup Options |
This section describes the System Setup program, which is used to change the system configuration information stored in NVRAM on the system board. If the system detects a discrepancy, an error message may appear on the screen that identifies the incorrect configuration settings. Many of these settings are established using the System Setup program. The system then prompts you to enter the System Setup program to correct the setting.
If an error message appears on your monitor screen while the system is booting, make a note of the message. Then, before entering the System Setup program, refer to “System Beep Codes” and “System Messages” for an explanation of the message and suggestions for correcting any errors. (It is normal to receive an error message the first time you boot your system after installing a memory upgrade. In that situation, do not refer to “System Beep Codes” and System Messages”. Instead, follow the instructions for performing a memory upgrade in “Adding Memory” in your Installation and Troubleshooting Guide.)
If you are given an option of pressing either <F1> to continue or <F2> to run the System Setup program, press the <F2> key.
Table 1 lists the keys that you use to view or change information on the System Setup screens and to exit the program.
Table 1. System Setup Navigation Keys
| Keys | Action |
|---|---|
| <Tab> or <Down arrow> | Moves to the next field. |
| <Shift>, <Tab>, or <Up arrow> | Moves to the previous field. |
| <Left arrow> or <Right arrow> | Cycles throught the setting in a field. In many fields, you can also type the appropriate value. |
| <Esc> | Exits the System Setup program and
reboots the system if any changes were made. For most of the options, any changes you make are recorded, but do not take effect until the next time you boot the system. For a few options (as noted in the help area), the changes take effect immediately. |
The following subsections outline the options on the System Setup screens.
When the System Setup program runs, the main program screen appears (see Figure 1).
Figure 1. Main System Setup Screen
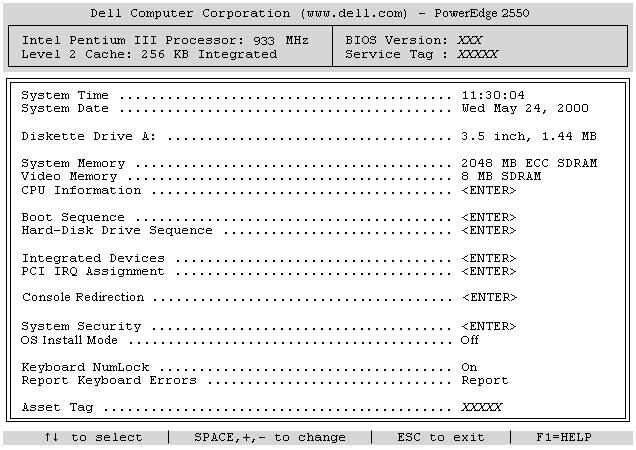 |
The following options or information fields appear on the main System Setup screen:
Table 2. System Setup Options
| Option | Function |
|---|---|
| System Time | Resets the time on the system's internal clock. |
| System Date | Resets the date on the system's internal calendar. |
| Diskette Drive A | Identifies the type of diskette drive installed in your system. |
System Memory |
Displays the amount of system memory. This option has no user-selectable settings. |
| Video Memory | Displays the amount of video memory. This option has no user-selectable settings. |
| CPU Information | Displays information related to the system bus and microprocessors. This screen has no user-selectable settings. |
| Boot Sequence | Displays the Boot Sequence screen; see “Boot Sequence Screen.” |
| Hard-Disk Drive Sequence | Displays the Hard-Disk Drive Sequence screen; see “Hard-Disk Drive Sequence Screen.” |
| Integrated Devices | Displays the Integrated Devices screen; see “Integrated Devices Screen.” |
| PCI IRQ Assignment | Displays a screen that allows you to change the IRQ allocated to each of the three integrated devices on the PCI bus, as well as any installed expansion cards that require an IRQ. See "PCI IRQ Assignment Screen". |
| Console Redirection | Displays a screen that allows you to configure console redirection. See “Console Redirection Screen.” |
| System Security | Displays a screen that allows you to configure the system password and setup password features. See “Using the System Password Feature" and "Using the Setup Password Feature". |
| OS Install Mode | Determines the maximum amount of memory available to the operating system; On sets the maximum memory available to the operating system to 256 MB; Off (default) makes all of the system memory available to the operating system. |
| Keyboard Numlock | Determines whether your system boots with the Num Lock mode activated on 101- or 102-key keyboards (it does not apply to 84-key keyboards). |
| Report Keyboard Error | Enables or
disables reporting of keyboard errors during POST. This option is useful when applied to self-starting servers or host systems that have no permanently attached keyboard. In these situations, selecting Do Not Report suppresses all error messages relating to the keyboard or to the keyboard controller during POST. This setting does not affect the operation of the keyboard itself if a keyboard is attached to the system. |
| Asset Tag | Displays the customer-programmable asset tag number for the system if an asset tage number has been assigned. To enter an asset tag number of up to 10 characters into NVRAM, follow the procedure in "Asset Tag Utility" in the "System Setup" chapter of the User's Guide. |
The Boot Sequence screen options determine the order in which the system looks for the file that it needs to load during system startup. Available options include the diskette drive, CD-ROM drive, and hard-disk drive. You can enable or disable a device by selecting it and pressing the spacebar. To change the order in which devices are searched, use the plus and minus keys (<+> and <–>).
The Hard-Disk Drive Sequence screen options determine the order in which the system searches hard-disk drives for the files that it needs to load during system startup. The choices depend on the particular hard-disk drive installed in your system. You can enable or disable a device by selecting it and pressing the spacebar. To change the order in which devices are searched, use the plus and minus keys (<+> and <–>).
The following devices on the system board are configured through this screen:
Table 3. Integrated Devices Options
| Option | Function |
|---|---|
| SCSI Controller | Determines whether the system's integrated small computer system interface (SCSI) controller is enabled. Changes take effect after reboot. |
| Embedded 10/100 NIC | Determines whether the system's integrated network interface controller (NIC) is enabled. Changes take effect after reboot. |
| NIC MAC Address | Displays the address of the media access control (MAC) address used by the integrated NIC. This field has no user-selectable settings. |
| Embedded 10/100/1000 NIC | Displays the address of the MAC address used by the integrated NIC. This field has no user-selectable settings. |
| Mouse Controller | Enables or disables the system's mouse controller. Disabling the mouse controller allows an expansion card to use IRQ12. |
| Serial Port 1, Serial Port 2 | Configure the system's
integrated serial ports. These options can be set to Auto (the default) to
automatically configure a port, to a particular designation, or to Off to disable
the port. If you set a serial port to Auto and add an expansion card containing a port configured to the same designation, the system automatically remaps the integrated port to the next available port designation that shares the same interrupt request (IRQ) setting. |
| Parallel Port | Configures the system's integrated parallel port. |
| Parallel Port Mode | Controls whether the system's integrated parallel port acts as an AT-compatible (unidirectional) or PS/2-compatible (bidirectional) port. To determine the correct mode to use, see the documentation that came with the peripheral device connected to the serial port. |
| USB Controller | Enables or disables the system's USB ports. Disabling the USB ports makes system resources available for other devices. |
| BIOS USB Support | Enables or disables the system’s BIOS USB support. If you have a PS/2 keyboard attached to the system, selecting OFF completely disables the system’s USB BIOS support. If you do not have a PS/2 keyboard attached to your system and you select OFF, the USB mouse and keyboard are functional only during the boot process. When set to ON, the USB mouse and keyboard are controlled by the BIOS until a USB device driver is loaded by the operating system. |
| IDE CD-ROM Interface | Enables or disables the system's IDE CD-ROM interface. |
| Diskette Controller | Enables or disables the system's diskette drive controller. With Auto (default) selected, the system turns off the controller when necessary to accommodate a controller card installed in an expansion slot. |
| Speaker | Determines whether the integrated speaker is On (the default) or Off. A change to this option takes effect immediately (rebooting the system is not required). |
PCI IRQ Assignment screen allows you to change the interrupt request (IRQ) allocated to each of the three integrated devices on the peripheral component interconnect (PCI) bus, as well as any installed expansion cards that require an IRQ.screen options determine the order in which the system looks for the file that it needs to load during system startup. Available options include the diskette drive, CD-ROM drive, and hard-disk drive. You can enable or disable a device by selecting it and pressing the spacebar. To change the order in which devices are searched, use the plus and minus keys (<+> and <–>).
 |
NOTE: Changing the IRQ setting of a PCI device may affect the IRQ settings of other PCI devices. |
Table 4 lists the following console redirection features through the Console Redirection screen.
Table 4. Console Redirections Options
| Option | Function |
|---|---|
| Console Redirection | Enables or disables the serial redirection function. This option can be set to DISABLED (the default) or ENABLED. When enabled, serial port 1 is assigned the address 3f8 and is utilized for serial redirection. |
| Remote Terminal Type | Allows you to view the terminal emulation supported by your client software. The default terminal type is VT100/200. |
| Redirection After Boot | Enables or disables the BIOS console redirection when the operating system is loaded. |
You can set the following security features through the System Security screen:
Table 5. System Security Options
| Option | Function |
|---|---|
| Password Status | Setting the Setup Password
option to Enabled allows you to prevent the system password from being changed or
disabled at system start-up. To lock the system password, you must first assign a setup password in the Setup Password option and then change the Password Status option to Locked. In this state, the system password cannot be changed through the System Password option and cannot be disabled at system start-up by pressing <Ctrl><Enter>. To unlock the system password, you must enter the setup password in the Setup Password option and then change the Password Status option to Unlocked. In this state, the system password can be disabled at system start-up by pressing <Ctrl><Enter> and then changed through the System Password option. |
| System Password | Displays the current status
of your system's password security feature and allows you to assign and verify a new
password. See "Using the System Password Feature" for instructions on assigning a system password and using or changing an existing system password. See "Disabling a Forgotten Password" for instructions on disabling a forgotten system password. |
| Setup Password | Lets you restrict access to
your system's System Setup program in the same way that you restrict access to your system
with the system password feature. See "Using the System Password Feature" for instructions on assigning a system password and using or changing an existing system password. See "Disabling a Forgotten Password" for instructions on disabling a forgotten system password. |
| Chassis Intrusion | Lets you enable the system chassis intrusion switch to detect if the system cover is removed. If this option is set to Enabled, a warning message is displayed during system startup. If the option is set to Enabled – Silent, no startup message is displayed, but the Chassis Intrusion option in the System Setup program will change to Detected. |
After you press <Esc> to exit the System Setup program, the Exit screen displays the following choices:
NOTICE: The password features provide a basic level of security for the data on your system. However, they are not foolproof. If your data requires more security, it is your responsibility to obtain and use additional forms of protection, such as data encryption programs. |
Your Dell system is shipped to you without the system password feature enabled. If system security is a concern, you should operate your system only with system password protection.
You can assign a system password whenever you use the System Setup program. After a system password is assigned, only those who know the password have full use of the system.
When the System Password option is set to Enabled, the system prompts you for the system password just after the system boots.
To change an existing system password, you must know the password (see “Deleting or Changing an Existing Setup Password ”). If you assign and later forget a system password, you need to be able to remove the system cover to change a jumper setting that disables the system password feature (see “Disabling a Forgotten Password”). Note that you erase the setup password at the same time.
NOTICE: If you leave your system running and unattended without having a system password assigned, or if you leave your system unlocked so that someone can disable the password by changing a jumper setting, anyone can access the data stored on your hard-disk drive.. |
Before you can assign a system password, you must enter the System Setup program and check the System Password option.
When a system password is assigned, the setting shown for the System Password option is Enabled. When the system password feature is disabled by a jumper setting on the system board, the setting shown is Disabled by Jumper. You cannot change or enter a new system password if either of these settings is displayed.
When no system password is assigned and the password jumper on the system board is in the enabled position (its default), the setting shown for the System Password option is Not Enabled. Only when this option is set to Not Enabled can you assign a system password, using the following procedure:
You can use up to seven characters in your password.
As you press each character key (or the spacebar key for a blank space), a placeholder appears in the field.
The password assignment operation recognizes keys by their location on the keyboard without distinguishing between lowercase and uppercase characters. For example, if you have an M in your password, the system recognizes either M or m as correct. Certain key combinations are not valid. If you enter one of these combinations, the speaker emits a beep. To erase a character when entering your password, press the <Backspace> key or the left-arrow key.
|
NOTE: To escape from the field without assigning a system password, press the <Tab> key or the <Shift><Tab> key combination to move to another field, or press the <Esc> key at any time prior to completing step 5. |
If the new system password is less than seven characters, the whole field fills with placeholders. Then the option heading changes to Verify Password, followed by another empty seven-character field in square brackets.
The System Password option changes to Enabled. Your system password is now set; you can exit the System Setup program and begin using your system. Note, however, that password protection does not take effect until you reboot the system by turning the system off and then on again.
Whenever you turn on your system, press the reset button, or reboot the system by pressing the <Ctrl><Alt><Del> key combination, the following prompt appears on the screen when the Password Status option is set to Unlocked:
Type in the password and... -- press <ENTER> to leave password security enabled. -- press <CTRL><ENTER> to disable password security. Enter password:
If the Password Status option is set to Locked, the following prompt appears:
Type the password and press <Enter>.
After you type the correct system password and press <Enter>, your system boots and you can use the keyboard and/or mouse to operate your system as usual.
|
NOTE: If you have assigned a setup password (see "Using the Setup Password Feature"), the system accepts your setup password as an alternate system password. |
If a wrong or incomplete system password is entered, the following message appears on the screen:
** Incorrect password. **
Enter password:
If a wrong or incomplete system password is entered, the following message appears on the screen:
** Incorrect password. **
Enter password:
If an incorrect or incomplete system password is entered again, the same message appears on the screen.
The third and subsequent times an incorrect or incomplete system password is entered, the system displays the following message:
** Incorrect password. **
Number of unsuccessful password attempts: 3
System halted! Must power down.
The number of unsuccessful attempts made to enter the correct system password can alert you to an unauthorized person attempting to use your system.
Even after your system is turned off and on, the previous message is displayed each time an incorrect or incomplete system password is entered.
|
NOTE: You can use the Password Status option in conjunction with System Password and Setup Password to further protect your system from unauthorized changes. |
To delete or change an existing system password, perform the following steps:
Your Dell system is shipped to you without the setup password feature enabled. If system security is a concern, you should operate your system with setup password protection.
You can assign a setup password whenever you use the System Setup program. After a setup password is assigned, only those who know the password have full use of the System Setup program.
To change an existing setup password, you must know the setup password (see "Deleting or Changing an Existing Setup Password"). If you assign and later forget a setup password, you need to remove the system cover to change a jumper setting that disables the setup password feature. Note that you erase the system password at the same time.
A setup password can be assigned (or changed) only when the Setup Password option is set to Not Enabled. To assign a setup password, highlight the Setup Password option and press the left- or right-arrow key. The system prompts you to enter and verify the password. If a character is illegal for password use, the system emits a beep.
|
NOTES: The setup password can be the same as the system
password. If the two passwords are different, the setup password can be used as an alternate system password. However, the system password cannot be used in place of the setup password. |
After you verify the password, the Setup Password setting changes to Enabled. The next time you enter the System Setup program, the system prompts you for the setup password.
A change to the Setup Password option becomes effective immediately (rebooting the system is not required).
If Setup Password is set to Enabled, you must enter the correct setup password before you can modify the majority of the System Setup options.
When you start the System Setup program, Page 2 of the System Setup screens appears with the Setup Password option highlighted, prompting you to type the password.
If you do not enter the correct password in three tries, the system lets you view, but not modify, the System Setup screens—with the following exceptions:
|
NOTE: You can use the Password Status option in conjunction with Setup Password to protect the system password from unauthorized changes. |
To delete or change an existing setup password, perform the following steps:
To delete or change an existing setup password, perform the following steps:
The setting changes to Not Enabled.
If you forget your system or setup password, you cannot operate your system or change settings in the System Setup program until you open the system chassis, change the password jumper setting to disable the passwords, and erase the existing passwords. For instructions, see “Jumpers, Switches, and Connectors”.