Manuals

Manuals
Control Panel and Badge: Dell OptiPlex GX50 Systems

Back to Contents Page

Control Panel and Badge

Dell™ OptiPlex™ GX50 Systems

  Removing the Control Panel and Badge

  Replacing the Control Panel and Badge


Removing the Control Panel and Badge

Small Form-Factor Desktop Computer

  1. Open the computer cover.

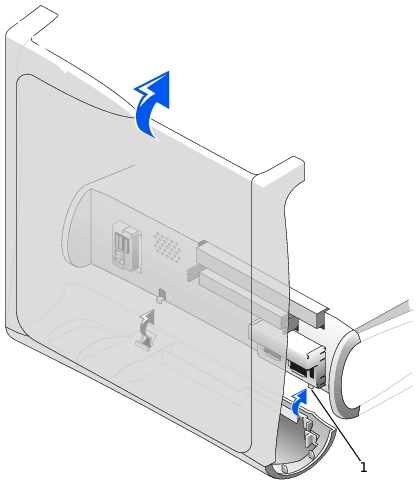
  2. Using a flat-blade screwdriver, release the tabs from the inside of the computer and remove the plastic computer cover from the metal component.

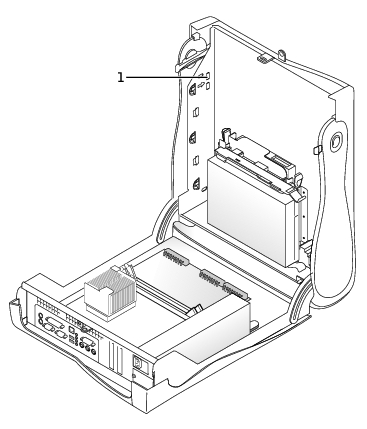
Releasing the Tabs—Small Form-Factor Computer

1 Tabs (2 on each side)
  1. To remove the badge, remove the accent door by pressing the middle of the door while lifting away the sides of the door.

    1. From inside the front bezel, push in on the two tabs on either side of the badge to release the badge.

    1. Press on the badge until it is freed.

  2. To remove the control panel, perform the following steps:

Removing the Control Panel—Small Form-Factor Computer

    1. Remove the metal control-panel shield.

    1. Remove the screw that holds the control panel to the computer.

Small Desktop Computer

  1. To remove the badge, open the front USB door.

    1. From inside the door, push in the two tabs on either side of the badge to release the badge.

    1. Press on the badge until it is freed.

  2. To remove the control panel, perform the following steps:

    1. Remove the front I/O panel.

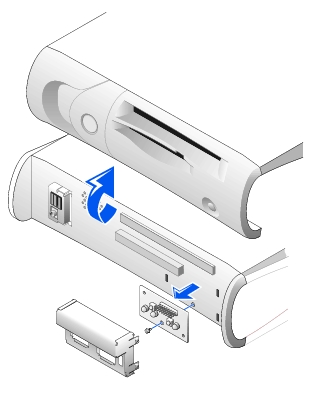
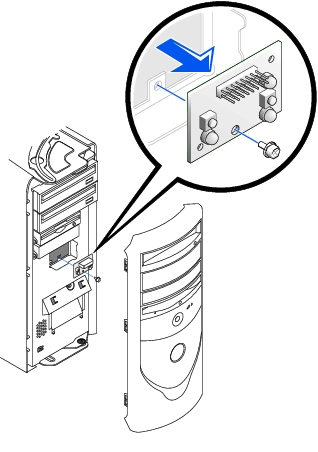
Removing the Control Panel—Small Desktop Computer

    1. Using an 8-inch #2 Phillips screwdriver, remove the screw holding the control panel to the computer, and pull the panel up and away from the computer.

Small Mini-Tower Computer

  1. To remove the badge, open the front USB door.

    1. From inside the door, push in the two tabs on either side of the badge to release the badge.

    1. Press on the badge until it is freed.

  2. To remove the control panel, perform the following steps:

    1. Lay the computer on its right side and open the cover.

    1. Remove the top and bottom panels of the computer by releasing the eight tabs on each panel.

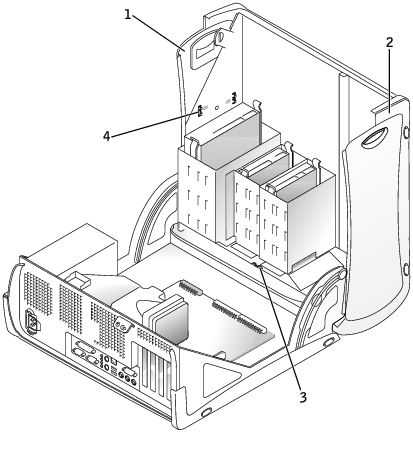
    2. Remove the front bezel by releasing the three tabs located on the front bezel: one tab is located by the CD drive, and two tabs are located by the I/O panel.

NOTE: This view of the small mini-tower chassis shows the CD drive data cable removed.

Front Bezel Tabs—Small Mini-Tower Computer

1 Top panel
2 Bottom panel
3 Front-panel tabs (3)
4 Top-panel tabs (8)
    1. Close the cover and remove the front bezel.

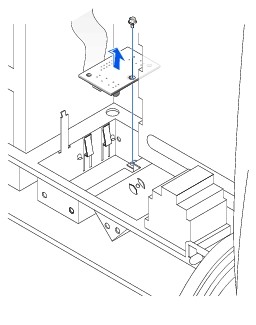
Control-Panel Removal

    1. Remove the screw holding the control panel to the chassis, and pull the panel up and away from the chassis.


Replacing the Control Panel and Badge

Small Form-Factor Desktop Computer

  1. Replace the control panel and the control-panel shield.

  2. Replace the plastic computer cover. Make sure that the two metal hooks and tabs are securely in place.

Replacing the Plastic Computer Cover—Small Form-Factor Computer

1 Metal hooks (2)

To help replace the plastic computer cover, remove the accent door and front mask from the plastic computer cover:

    1. Remove the front mask by releasing the tabs on the inside of the plastic computer cover.

    1. Remove the accent door by pressing the middle of the door while lifting away the sides of the door.

    2. After replacing the plastic computer cover, snap the front mask and accent door into place.

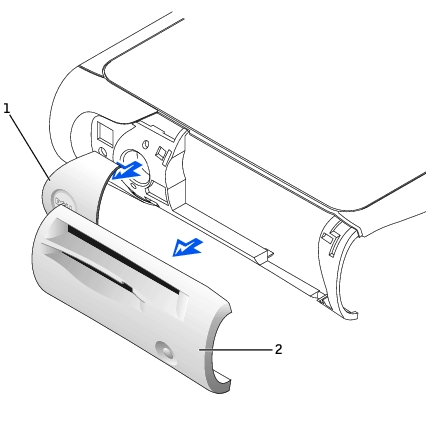
Removing the Front Mask and Accent Door—Small Form-Factor Computer

1 Accent door
2 Front mask
  1. Replace the badge by following, in reverse order, the procedures in "Removing the Control Panel and Badge" for the small form-factor desktop computer.

Small Desktop Computer

  1. Replace the control panel and secure it to the computer by replacing the screw you removed in step 2 of the removal procedure.

  2. Replace the front I/O panel.

  3. Replace the badge by following, in reverse order, the procedures in "Removing the Control Panel and Badge" for the small desktop computer.

Small Mini-Tower Computer

  1. Replace the control panel by following the "Removing the Control Panel and Badge" procedure in reverse, ensuring that the tabs on the top panel, bottom panel, and front panel are secure.

  2. Replace the badge by following, in reverse order, the procedures in "Removing the Control Panel and Badge" for the small mini-tower computer.


Back to Contents Page


Copyright 1999-2007 Dell Inc.
Battery Recall | About Dell | Conditions of Sale & Site Terms | Unresolved Issues | NEW Privacy Policy | Contact Us | Site Map | Feedback

Top
Large Text
sn AP28