
|
Overview | |
Starting the Dell Diagnostics |
|
Features | |
Advanced Testing |
|
Before You Start Testing |
If you experience a problem with your computer, run the Dell Diagnostics before you call Dell for technical assistance. The diagnostics tests check your computer's hardware without additional equipment and without the risk of destroying data. When the diagnostics tests complete without indicating problems, you can have confidence in your computer's operation. If the tests indicate a problem you cannot solve, the test error messages provide important information you need when talking to Dell's service and support personnel.
NOTICE: Only use the Dell Diagnostics to test your Dell computer system. Using this program with other computers may cause incorrect computer responses or result in error messages.
The diagnostic test group features allow you to take the following actions:
 |
NOTE: Dell recommends that you print these procedures before you begin. |
| |
NOTE: Record your current boot sequence in the event you want to restore it after running the Dell Diagnostics. |
NOTE: To change the boot sequence, repeat steps 1 through 6, set the boot sequence to fit your needs, and restart your computer.
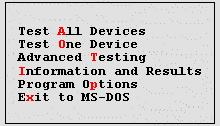
- Test All Devices — Performs quick or extensive tests on all devices
- Test One Device — Performs quick or extensive tests on a single device after you select it from a list of device groups. After you select Test One Device, press <F1> for more information about a test
- Advanced Testing — Allows you to modify the parameters of a test, select a group of tests to perform, and access additional information about Advanced Testing
- Information and Results — Provides test results, test errors, version numbers of subtests, and additional information on the Dell Diagnostics
- Program Options — Allows you to change the settings of the Dell Diagnostics
- Exit to MS-DOS — Exits to the MS-DOS® prompt
When you select Advanced Testing from the Diagnostics Main Menu screen, the following advanced testing screen appears.
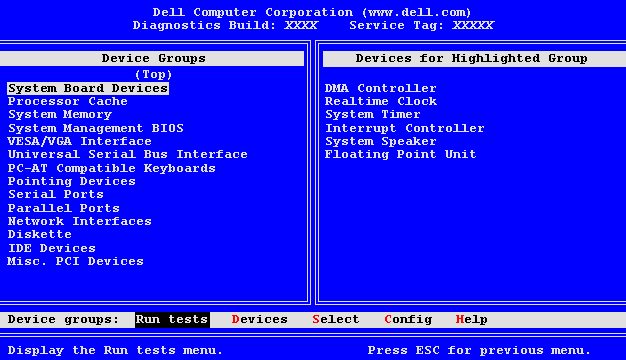
Information in the Advanced Testing screen is presented as follows:
NOTE: The diagnostics may not list in the Device Groups area the names of all components or devices that are part of your computer system. For example, it may not list a printer even though it is connected to your computer. However, the parallel port to which the printer is connected appears in the Device Groups list. You can test your printer connection in the Parallel Ports tests.
For more information on using the Advanced Testing screen, select the Help menu option.
| |
NOTE: The options displayed on your screen should reflect the hardware configuration of your computer. |
The Help options and a description of their functions are presented in the following table.
| Help Option | Description |
| Menu | Describes the Advanced Testing screen, the Device Groups, and the diagnostic menus and commands and gives instructions on how to use them |
| Keys | Explains the functions of all keystrokes that can be used in the Dell Diagnostics |
| Device Group | Describes the highlighted group in the Device Groups list on the main menu and provides reasons for using certain tests |
| Device | Describes the highlighted device in the Device Groups list on the Advanced Testing screen |
| Test | Describes the test procedure for each highlighted test group subtest |
| Versions | Lists the version numbers of the subtests |